Showing posts with label browser. Show all posts

Friday, December 17, 2010

Traceability between an EMF Java model and the corresponding source code

MoDisco 0.9M4 has been released this week with Eclipse Indigo M4.

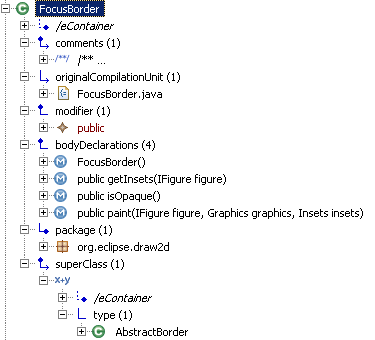
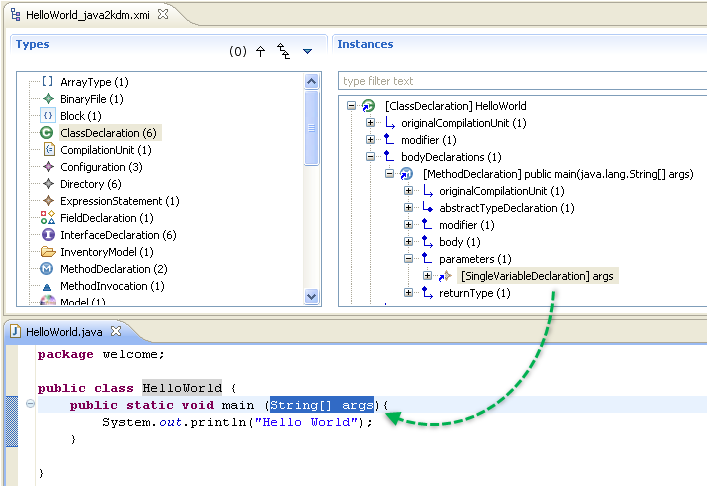
One of the new interesting features is the traceability between an EMF model created from the reverse-engineering of a Java application and the corresponding source code.

It allows to directly navigate from elements of the Java model in the MoDisco Model Browser to the corresponding code fragment in a Java editor.


This feature is provided by a new Java discoverer which can be executed with the MoDisco menu "Discover Java and Inventory model from Java source code" available on a Java project.

This discoverer automatically creates three EMF models:
  • a Java model describing the content of the source code: it is the model created by the basic Java discoverer.
  • a KDM Inventory model describing the structure of the Java project (all the files and folders).
  • a traceability model containing relations between the Java model elements and source code fragments
If you need to know more about these models, you can read the documentation of the discoverer.

When you launch the discoverer on a java project, the traceability model is automatically opened in the MoDisco model browser. 

To activate the synchronization with the Java source code editor, you need to activate the "Synchronize with source code option". 


Now, when you click on a model element in the model browser, the corresponding source code is automatically highlighted in the Java source code editor (otherwise, the double-click on an element opens the property view).

Wednesday, December 15, 2010

Spy On Your Models - Part 4

In this sequence of posts, I explain how to use the Model Browser provided by MoDisco to inspect an EMF model.

In the first three posts, I have described how to directly access to instances of a given type, how to navigate through the model elements and how to customize the browser.

In this last post, I will now describe how to create and execute queries on model elements directly from the browser.

The features presented in the previous posts, allow you to navigate through the elements of your model by traversing the links. You can also highlight some characteristics of specific elements by defining a customization which dynamically change their rendering (icon, label, font, color, etc).

But in some situations, you would like to calculate values from model elements. These values could be of basic types (numbers or strings) or could be other model elements.

MoDisco provides a mechanism to execute queries interactively on model elements selected in the Model Browser. First, I will explain how to execute queries, and we will see later in this post how to declare and implement them.

There are two possibilities to execute a query.

The first one consists in selecting model elements in the browser and clicking on the menu "Execute Query ...". It opens the "Query Execution" view which contains two main parts:

  • The elements on which to execute the query. It is filled with the elements you have selected, but you can also remove elements from this list or drag&drop new elements  from the browser.
  • The registered queries which can be executed on the selected elements


When you click on "Execute" the selected query is executed on each model element and the result is displayed in a table (more possibilities will be provided with future versions).


The table displays each returned value on a line. If the result is a basic type, the table contains only one column. But if the result is a model element, the table contains several columns:

  • A colum "Label" which contains the calculated label of the object.
  • A column "Metaclass" which contains the type of the object
  • A column "/eContainer" which contains the parent of the object
  • A column "Query Context" which contains the object for which the query has returned the object
  • A column for each attribute of the corresponding metaclass
  • A column for each reference of the corresponding metaclass (for nary references, the tablel displays the number of related objects).
On each line, it is possible to re-execute a query or to browse the selected element with the model browser.

To execute a query from the browser, the second possibility consists in adding the query to a model element in the browser by clicking on the menu "Dispaly Queries on Selected Element":


A dialog is opened with all the applicable queries:


The selected query is added to the model element. When you click on this query, it is executed and the result is displayed under the query:


Now, to create your own query, the first step consists in creating a QuerySet in a MoDisco project: right-click on the project, select the menu "New>Other" and select "MoDisco / QuerySet model":


Give a name to your new QuerySet and MoDisco creates it in the project:


A QuerySet is a model which contains the declaration of the queries. The new QuerySet is empty. So, to start declaring the queries, just double-click on the QuerySet to open it with the dedicated editor:


Now, you need to associate the QuerySet to a metamodel: all the queries will apply on model elements of the corresponding models. 

Let's say we want to declare queries for UML model elements. This association is done in two steps: 
  • Load the ECore definition of the metamodel: right click on the ModelQuerySet instance, select the menu "Load meta-model ressource" and select the right ECore definition.

  • Associate this metamodel to the QuerySet: double-click on the ModelQuerySet instance to open its property view, click on the button in the "Associated Metamodels" property field, and select the metamodel.

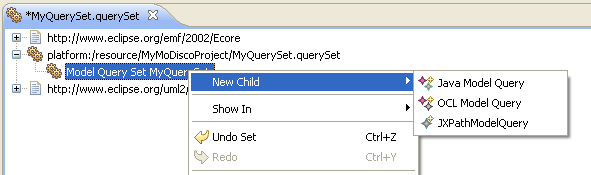
Now, you can start declaring the queries: right-click on the ModelQuerySet instance and click on the "New Child" menu. You can declare queries of three kinds: Java, OCL or XPath.


For each query, you have to declare its name, its scope (on which elements the query is applicable), its return type and its multiplicity (lower and upper bounds). Implementing the body of the query depends on the kind of query:
  • OCL: enter an OCL expression in the "Query" property
  • XPath: enter an XPath expression in the "Query" property
  • Java: enter the name of a Java class which implements the query

To know more about how to declare a Query, you can read the reference documentation of the MoDisco QueryManager.


Thursday, October 28, 2010

Spy On Your Models - Part 3


In this sequence of posts, I explain how to use the Model Browser provided by MoDisco to inspect an EMF model.


In the first two posts, I have described how to directly access to instances of a given type, and how to navigate through the model elements. In this third post, I will now describe how to customize the browser.


When your model contains a large number of model elements, you need help to identify the nature of the objects your are looking for. A good idea is to define a graphical extension to associate a specific graphical rendering (icon, label, color, etc). It can be achieved with the EMF.Edit framework by developing content and label provider classes. You can develop and deploy a new plug-in, and once this plug-in is installed, the customization is applied systematically. 


But in some situations, you need a more flexible customization. A customization which presents the model according to a given viewpoint. A customizations that you apply temporarily, depending on a working situation. 
This is what you can do by creating a UICustom model. 


A UICustom model defines graphical properties for elements of a metamodel (a ECore model). These properties can be loaded dynamically by the Model Browser and applied to the model elements.
First, you have to create a new MoDisco project:


Then, create a UICustom model in this project:


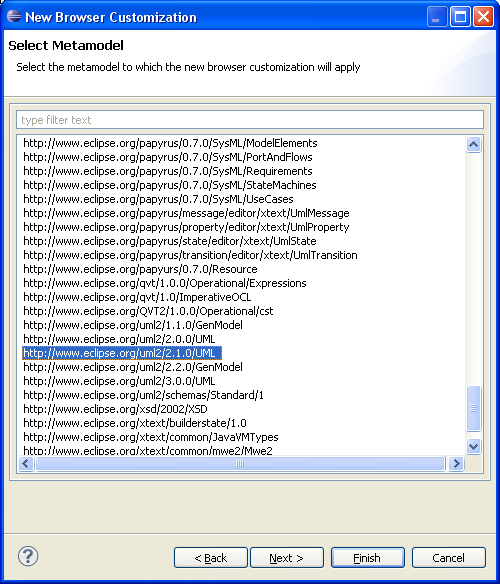
The UICustom creation wizard asks which is the metamodel to be customized. It proposes all the ECore models registered in your Eclipse:


Once created, you can edit the UICustom model with the editor provided by MoDisco:


Now you can select a metaclass and edit its graphical properties (label, bold, italic, font, color, icon, visible, etc). You can also customize the attributes and the references of the metaclass.


Each graphical property can be set with a static value (for example, define a new icon for all the instances of Class) or a dynamic value, computed by a Query (for example, the label of an instance of Class can be italic if its "isAbstract" value is true).


To understand how to define a customization, you can read the user manual in the MoDisco wiki.


Once saved, a UICustom is applicable. Click on the "Load Customization" button in the toolbar :


Your UICustom model appears with all the other registered UICustom models. You can select it to apply it on the current model loaded in the Model Browser.


In the next post, I will describe how to create and execute queries on model elements directly from the Model Browser.

Monday, October 18, 2010

Spy On Your Models - Part 2


In this sequence of posts, I explain how to use the Model Browser provided by MoDisco to inspect an EMF model.

In the first post, I have described the Types panel which allows to directly access to all the EMF instances of a given EClass. In this second post, I will now describe the Instances panel which allows to inspect an EMF object and navigate to all the other connected EMF objects.


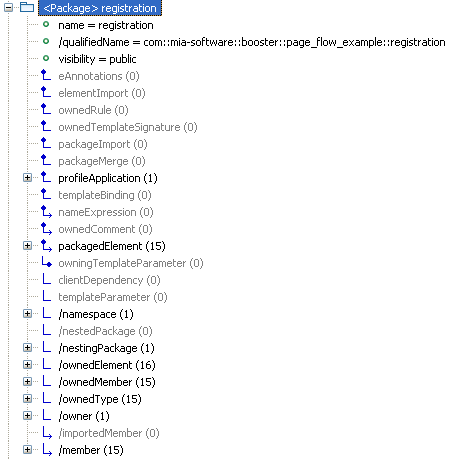
This panel is a tree containing all the instances of the type selected in the Type panel. If you open a model element, you can see all its properties: the attributes and the references declared by the type (the metaclass) in the corresponding ECore model (the metamodel).


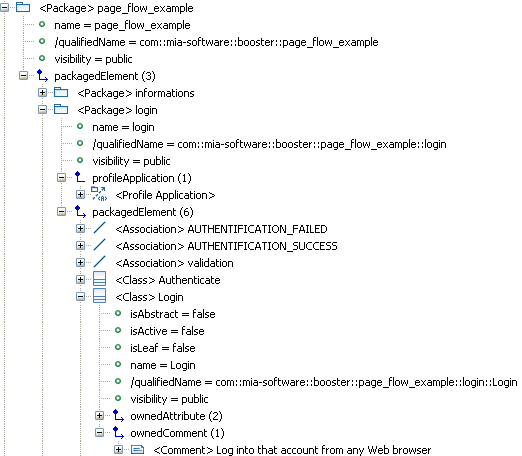
The attributes are displayed with a green bullet and the value of the selected instance. The references are displayed with an icon inspired by UML associations: containment references have a diamond (like UML compositions), references with no opposite are terminated by an arrow (like UML navigable roles). Derived properties are prefixed by "/".

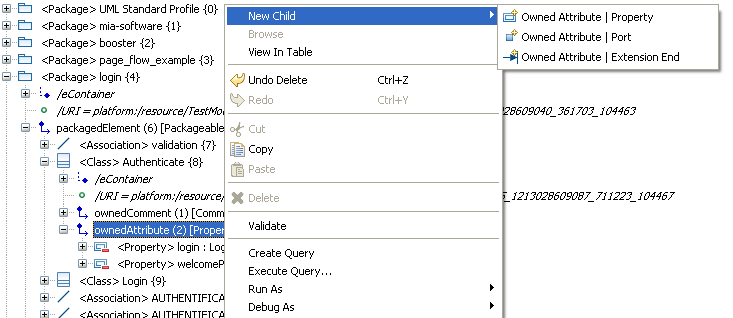
On each reference, you can right-click and select the "Add child" menu to add new EMF objects.


If you want to hide empty and derived references, unselect the buttons "Show Empty Links" and "Show Derived Links". Then the tree will only display setable references which have at least one connected object.


When you open a reference, you can see all the objects connected through this reference. This is very helpful to know how the objects are connected to each other. Especially when the current type declares several references of the same type: in this case, you see precisely the connected objects under each reference.

This instance tree proposes several other interesting options.


Let's see some of these options:
  • Show Multiplicity: This option displays the upper and lower bounds (between square brackets) of each structural feature as they are defined in the corresponding ECore model.
  • Show Ordering: This option displays the index (between square brackets) of each element under a reference which has the "ordered" ECore property set to true. It is useful if you have already selected the "Sort instances" option which displays the elements in an alphabetical order. See below the instances of Property sorted by name under the ownedAttribute reference: they are suffixed by the index within the list of attributes of the current class.
  • Show Opposite Links: this option indicates the name of the opposite links (if there is one defined in the ECore model). This option helps to know which reference allows to go back to a given object. Below, you can see that the owner reference can be used to go from an instance of Comment back to the class CollectInformation.
  • Show Container: When there is no opposite link defined, this option helps you to go back to the container (the objects which holds the current object with a "containment" reference). The eContainer reference is part of the EMF framework.

  • Show Types of Links: This option indicates the Type declared for each reference. It is useful to know what kind of objects you can find under a reference. Below, you can see that the packagedElement reference accepts instances of PackageableElement. It explains why you find instances of Class and Association which both inherit from PackageableElement.

In the next post, I will explain how this browser can be dynamically extended and customized.

Thursday, October 14, 2010

Spy On Your Models - Part 1

Have you ever been stuck with an EMF model, trying to find what was going wrong? Which relation is broken or missing ? Where is that model element which should be there, related to that other one ? How many instances this EClass has in the model ?

Of course, you can use the EMF reflexive editor. It is suitable for small models, but when your model contains a lot of model elements it is hard to find your way (you must start from the roots elements, you don't see the name of the relations between the objects, the tree doesn't show the objects pointed by non-containment relations, etc).

So, if you really need this kind of information (and if you are not an expert in reading XMI files in plain text), the model browser provided by MoDisco is a solution for you.

To allow inspecting the details of large and complex EMF models, MoDisco (the Eclipse/modeling project dedicated to Software Modernization) provides an editor with lots of interesting features.

After MoDisco installation, you can right-click on any EMF resource and open the browser by selecting the menu "Open with > MoDisco Browser".


In this suite of posts, I will describe the main features of this tool.

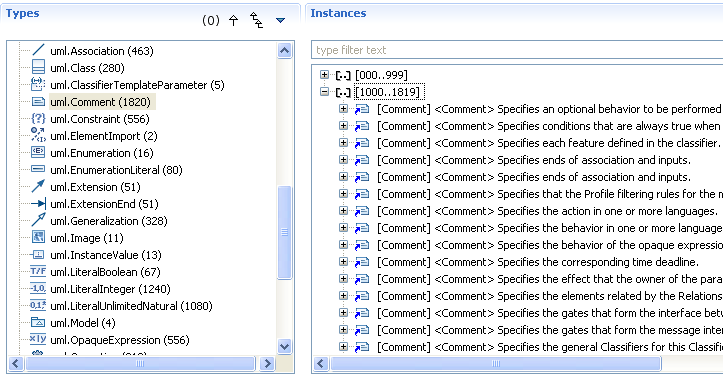
The first feature is a panel, on the left-side of the browser, displaying the classes (metaclasses) of the corresponding ECore definition (the metamodel). The selection of a type displays all its instances in the right-side panel. Each type is suffixed by the number of its instances. By default, only the types with at least one instance are listed, but if you click on the "(0)" button, the empty metaclasses are also listed.


Sometimes, it can be helpful to see also the instances of the subtypes too. For example, in a UML model, if you consider the DataType metaclass you may need to access also to the Enumeration and PrimitiveType instances. It is possible by clicking on the button "Display Instances of Submetaclasses".

By clicking on the button "Show Derivation Tree", you can also display these types in a tree, organized according to the "eSuperTypes" relation.


Four other options are available: to sort the types alphabetically, to sort them by the number of their instances, to group them by package and to show their full qualified name.

Of course, standard features provided by EMF on EClass are still available. For example to get the references to a metaclass, the menu "Show References" opens the view "EClass References".


Another important feature provided by the browser is the management of large models. If a type as more than 1000 instances, they are displayed by groups of 1000 instances.


In a next post, I will describe the features related to the Instances panel which allows to view the properties of each instance and to navigate through its references to other instances.

Monday, May 31, 2010

MoDisco is ready for Helios

MoDisco 0.8 RC2 has been released last week. It contains all the features which will be shipped with the final Eclipse Helios release (available June 23, 2010).

Here are the main features added since MoDisco 0.8 M5:


Edition of models

MoDisco provides a browser to inspect complex EMF models. Now it is possible to use the ModelBrowser to edit and modify the instances of the loaded EMF model:
  • Edit attributes through the Properties view
  • Create new children elements
  • Delete a model element (with all its references)
  • Cut/Copy/Paste a model element
  • Undo/Redo modifications
  • Save and Save As the model


In addition, when the model is externally modified, the browser is automatically refreshed.


Collapse Link option

One of the main differences between the MoDisco ModelBrowser and the default EMF Reflective Editor is the way the children elements are displayed.

In the Reflective Editor, all the children model elements are placed directly under the parent model element: you don't see how the children are connected to the parent.


In the MoDisco ModelBrowser, the children are grouped under an intermediate node corresponding to the link defined in the metamodel.


This feature is very useful when instances of the same type can be associated through several different links: you can know precisely how the children are connected to the parent.
But in some cases this option is not convenient (for example when each children of a given type can only been attached with one relation).

That's why we have added a new option to the Customization model and corresponding editor: you can now collapse a link to hide this link in the browser and display the corresponding children directly under the parent.


Reusable Model TreeView

The TreeView developped for the ModelBrowser is now compliant with CNF (Common Navigator Framework).

This TreeView displays the model elements properties and allows accessing to related objects by navigating through relations defined in the metamodel.

Now this TreeView can be reused and integrated to any component compliant with CNF, and then benefit from the customization and extensibity mechanisms to dynamically configure which properties and relations are visible, add derived attributes and relations, and change how the model elements are displayed (label, color, icon, ...).

For example, the TreeView can easily be integrated into the Project Explorer to inspect the content of any EMF model:


The TreeView has already been adopted by the Papyrus team to replace the default treeview in the Package Explorer.


Java Model Query creation wizard

MoDisco provides a QueryManager to allow executing model queries independently of any technology. Drivers for Java, OCL and JXPath are provided to execute queries written with these technologies.

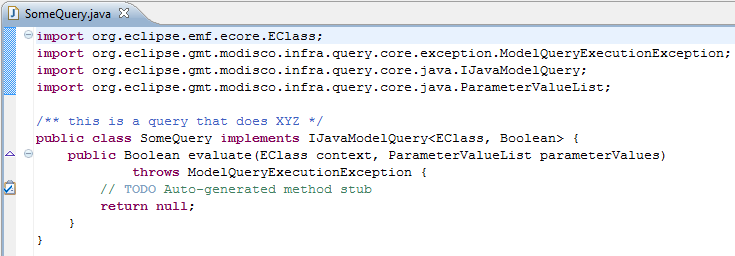
Since MoDisco 0.8 M6, a wizard facilitates the creation of queries written in Java:


The wizard generates the corresponding Java class stub, with the correct imports and generic parameters instantiation.